Saturday, October 25, 2025


Women’s World Cup 2025: England on the Edge as New Zealand Miss Golden Chance to Strike!

The Women’s World Cup 2025 is heating up in Visakhapatnam — and today’s England vs New Zealand clash is already making headlines for all the wrong reasons.


Sophie Devine, leading the White Ferns in what could be her final ODI, won the toss and bravely chose to bat first. The decision looked smart at first — the pitch was dry, the sun was blazing, and England’s opening spell was all over the place.

😬 England’s Worst Start Yet

England, who have been rock-solid all tournament, opened with a surprisingly sloppy bowling performance. The first 10 overs were described by commentators as “their worst of the tournament.” Wide balls, missed lengths, and dropped catches — it was chaos from the defending champions.

🌪️ But New Zealand Couldn’t Capitalize

The heartbreak? New Zealand just couldn’t punish England’s errors. Boundaries were rare, strike rotation was sluggish, and pressure faded as quickly as it built. Despite being handed golden chances, the White Ferns struggled to convert them into a commanding total.

BBC’s live commentary summed it up perfectly:

“England haven’t bowled like this in the whole tournament… and New Zealand haven’t punished them enough for it.”

🧊 Devine’s Emotional Farewell

For Sophie Devine, this match means more than just points on the table. It’s likely her swansong ODI, marking the end of a remarkable era in New Zealand women’s cricket. Her calm leadership was visible as she anchored the innings, but even her experience couldn’t fully lift the side’s momentum.

☀️ Conditions Turn Up the Heat

The players faced extreme heat and humidity — over 30°C on a slow, sticky pitch. As fatigue set in, both teams battled not just each other but the weather too. Fielders looked exhausted, and bowlers struggled to find rhythm.

🔮 What’s Next?

England, already through to the semi-finals, will want to avoid any dip in form heading into the knockout stage. New Zealand, meanwhile, are fighting for pride, consistency, and to give Devine the farewell she deserves.

This clash may not be a high-scoring thriller, but it’s dripping with emotion, unpredictability, and the kind of tension that defines World Cup moments.


💬 What do you think — is England showing cracks at the wrong time, or will New Zealand regret not taking their chances?
Drop your thoughts below!

📢 Follow us for more Women’s World Cup 2025 updates, viral moments, and player stories that go beyond the scoreboard!

#WomensWorldCup #ENGvsNZ #CricketWorldCup #SophieDevine #SportsBuzz #CricketFans #ViralSports 


Tuesday, April 1, 2025

How AI Revolutionizing Taxi Booking Apps

AI Revolutionizing Taxi Booking Apps

Table of Contents:

  1. Introduction
  2. What is AI Taxi Booking?
  3. Enhanced User Experience with AI
  4. Optimized Operations and Efficiency
  5. Improved Safety and Security
  6. AI in Predictive Analysis and Customer Service
  7. The Future of AI in Ride-Hailing
  8. Conclusion

1. Introduction (Hook & Problem/Question)

Imagine a world where your taxi arrives precisely when you need it, takes the fastest route, and even anticipates your future travel needs. This isn't science fiction; it's the reality of AI-powered taxi booking. How is artificial intelligence reshaping the ride-hailing industry, and what does it mean for you? In this blog, we'll explore the transformative impact of AI taxi booking and how it's driving the future of transportation.

2. What is AI Taxi Booking? (Definition & Explanation)

AI taxi booking refers to the integration of artificial intelligence and machine learning into ride-hailing applications. This involves using algorithms to analyze vast amounts of data, including traffic patterns, user behavior, and driver availability, to optimize various aspects of the taxi service. This technology utilizes artificial intelligence ride-hailing techniques to create a smoother more efficient experience.

3. Enhanced User Experience with AI

One of the most significant benefits of AI in taxi booking is the enhanced user experience. AI-powered transportation allows for more accurate arrival time predictions, personalized ride recommendations, and faster booking processes. For example, machine learning algorithms can learn your preferred pickup and drop-off locations, making future bookings quicker. This also allows for improved intelligent ride matching.

4. Optimized Operations and Efficiency

AI plays a crucial role in optimizing operations and increasing efficiency for taxi companies. AI route optimization helps drivers navigate the fastest routes, reducing travel time and fuel consumption. Moreover, automated dispatch systems use AI to match riders with the nearest available drivers, minimizing wait times.

5. Improved Safety and Security

Safety is paramount in the ride-hailing industry, and AI contributes to creating safer experiences. AI driver behavior analysis can detect potentially dangerous driving patterns, allowing companies to take proactive measures. Additionally, AI-powered facial recognition and identity verification systems enhance security for both riders and drivers.

6. AI in Predictive Analysis and Customer Service

Predictive taxi booking is another area where AI excels. By analyzing historical data, AI can predict demand patterns, allowing companies to allocate resources more efficiently. Furthermore, AI customer service taxi solutions, such as chatbots, provide instant support and resolve issues quickly.

7. The Future of AI in Ride-Hailing

The future of AI in ride-hailing is bright. As AI technology continues to advance, we can expect even more innovative applications. From self-driving taxis to personalized ride experiences, AI is poised to revolutionize the way we travel.

8. Conclusion (Call to Action & Conclusion)

AI is fundamentally changing the taxi booking industry, making it more efficient, safe, and user-friendly. By embracing AI taxi booking, we can unlock new possibilities and create a more seamless transportation experience. Are you ready to experience the future of ride-hailing? Share your thoughts in the comments below!


Ixora Infotech Private Limited
Launch your own custom Apps Contacts: +918770148013

Thursday, April 20, 2023

Taxi Booking Applications


Blog powered by IXORA INFOTECH PVT. LTD.

  5 Reasons Why Flutter is the Best Choice for Developing Taxi Booking Applications


Flutter has become a popular cross-platform framework for mobile app development in recent years, especially for developing taxi booking applications. There are several reasons why Flutter is a great choice for such apps:


1. Cross-platform compatibility: Flutter allows developers to build apps that can run on both Android and iOS platforms using a single codebase, making the development process more efficient.

2. Fast development: Flutter provides a hot-reload feature that enables developers to see changes they make to the app in real-time, speeding up the development process.

3. High performance: Flutter is known for its high performance and speed, thanks to its reactive programming model that facilitates fast rendering and smooth animations, resulting in a seamless user experience.

4. Rich set of widgets: Flutter provides a wide range of customizable widgets that enable developers to create stunning and engaging user interfaces with ease.

5. Third-party integrations: Flutter has an active and supportive community that provides a vast selection of third-party packages and plugins. These integrations enable developers to add various functionalities to their apps, such as payment gateways, maps, and location services.

In summary, Flutter's cross-platform compatibility, fast development, high performance, rich set of widgets, and third-party integrations make it an excellent choice for building high-quality and engaging taxi booking applications. Utilizing Flutter's capabilities can help developers create a seamless and robust app experience on both Android and iOS platforms.


IXORA INFOTECH PVT. LTD.
A Leading Mobile Apps Development Company in India

Hire - Graphic Designer              Hire - Project Manager

www.ixorainfotech.com

Monday, December 10, 2018

Digital Marketing

Digital Marketing

Digital marketing is the marketing of products or services using digital technologies, mainly on the Internet, but also including mobile phones, display advertising, and any other digital medium.


Digital Marketing Methods 

Search engine optimization (SEO)
Search engine marketing (SEM)
Content marketing 
Influencer marketing 
Content automation
Campaign marketing 
Data-driven marketing
E-commerce marketing
Social media marketing 
Social media optimization
E-mail direct marketing
Display advertising
E–books 
Optical disks 
Games are becoming more common in our advancing technology.


Use in the digital era


There are a number of ways brands can use digital marketing to benefit their marketing efforts.


Word of mouth communications and peer-to-peer dialogue often have a greater effect on customers, since they are not sent directly from the company and are therefore not planned. 


Ease of access


A key objective is engaging digital marketing customers and allowing them to interact with the brand through servicing and delivery of digital media. 


Effectiveness
Brand awareness has been proven to work with more effectiveness in countries that are high in uncertainty avoidance, also these countries that have uncertainty avoidance; social media marketing works effectively.


To know more watch our video on digital marketing-


source-wikipedia,internet,google.

How to create React Native Application -

React Native Application

 In this blog am introduce some command for creating react native application.
1. How to create first project-command 
          react-native init ProjectName

2.Start npm-command
           npm start

3.Run Application
           react-native run-android

If you face error Gradle build faild -run command inside Project folder-android folder
          gradlew clean


Friday, December 7, 2018

Android Check-Box Tutorial

Android Check-Box Tutorial


CheckBox is used to implement multiple choices. There can be a lot of usage of checkboxes. For example, it can be used to know the hobby of the user, activate/deactivate the specific action etc..

Mainly for checkbox there are two methods

1. isChecked() - Returns true if it checked otherwise false.
2. setChecked(boolean status) - change the status of checkbox.

see the below piece of code:


if(pizza.isChecked()){
    result.append("\nPizza 100Rs");
    totalamount+=100;
}
if(coffe.isChecked()){
    result.append("\nCoffee 50Rs");
    totalamount+=50;
}
if(tea.isChecked()){
    result.append("\nTea 10Rs");
    totalamount+=10;
}

To watch tutorial video please click on below video link-


How to work with controllers in CodeIgniter


Controllers are the ones that receive the HTTP requests, communicate with models to get the data, send it to views to generate the HTML code and return the results to the web browser. In this tutorial, we will look at how we can use Controllers in CodeIgniter and create our own controller(s) that will extend the CodeIgniter core Controller class. This tutorial assumes you read the article on how to install and configure a CodeIgniter project. We assume you have removed the index
HERE,
  • “$route['default_controller'] = 'welcome';” defines welcome as the default controller.
  • ['custom_controller'] = 'welcome';” defines welcome as the default controller.
  • When you browse the URL localhost/Test_CI/, CodeIgniter will look for a controller named Test and by default will call the testindex method.
      <?php
      defined('BASEPATH') OR exit('No direct script access allowed');

      class Test extends CI_Controller {

      public function testindex()
      {
      echo "hello ";
      echo "welcome ";
      }
      public function user(){
      echo "hello ixora";
      }
      }
          HERE,
        • “class Test extends CI_Controller” defines the class Test and extends the codeigniter core controller.
        • “public function testindex()” is the function and here methode name is testindex

Thursday, December 6, 2018

How to install react Native

React Native Installation 
How to install reactnative-

Need Node.react native command line interface,python,Android Studio,JDk,Visual Studio.

Follow these instruction if you want to install react native
1-Node,paython,JDk
Install Node.paython2 by a Chocolatey ,this is popular package manager.
React Native require a recent version of JDK.and Paython,Both can be install by CHOCOLATEY.

Download Chocolety From This Link - https://chocolatey.org/

After download and install chocolatey run these command in command prompt-

Open an Administrator Command Prompt (right click Command Prompt and select "Run as Administrator"), then run the following command:

Command -  choco install -y nodejs.install python2 jdk8

if you have already install make sure that is current version.

Install Node from here = https://nodejs.org/en/download/
After that Node come with npm
 -install npm
Run Command in command prompt

command= npm install -g react-native-cli
After this -install Android Studio,Visual Studio latest version.
Complete installation.
You Can Watch Video here-

Tuesday, December 4, 2018

Android Tab Layout

Android Tab-Layout Tutorial

TabLayout is used to implement horizontal tabs. As you see tabs in most of the app like contacts, whatsapp etc.In this blog we learn to define tabs with fragment.

To implement in your project firstly you have to add a support library in gradle file with latest version. com.android.support:design:27.1.1

Then you have to define xml file in which yo have implements the app bar widget with tool bar and a tablayout in it. And a View Pager to scroll or slides the screen.

Now add the fragment by right click on the java folder and take blank fragments with a single text or put the code in it.

Now in MainActivity.java you have to define ViewPager Adapter class and add the following methods.

public class MainActivity extends AppCompatActivity {
    Toolbar tb;
    TabLayout tabLayout;
    ViewPager viewPager;
    ViewPagerAdapter viewPagerAdapter;

    @Override    protected void onCreate(Bundle savedInstanceState) {
        super.onCreate(savedInstanceState);
        setContentView(R.layout.activity_main);

        tb = (Toolbar) findViewById(R.id.toolbar);
        setSupportActionBar(tb);
        getSupportActionBar().setDisplayHomeAsUpEnabled(true);

        viewPager = (ViewPager) findViewById(R.id.viewpager);
        setupViewPager(viewPager);

        tabLayout = (TabLayout) findViewById(R.id.tabs);
        tabLayout.setupWithViewPager(viewPager);


    }

    private void setupViewPager(ViewPager viewPager) {
        ViewPagerAdapter adapter = new ViewPagerAdapter(getSupportFragmentManager());
        adapter.addFragment(new FirstFragment(), "First");
        adapter.addFragment(new SecondFragments(), "Second");
        adapter.addFragment(new thirdFragments(), "Third");


        viewPager.setAdapter(adapter);
    }


    class ViewPagerAdapter extends FragmentPagerAdapter {
        private final List<Fragment> mFragmentList = new ArrayList<>();
        private final List<String> mFragmentTitleList = new ArrayList<>();

       public void addFragment(Fragment fragment,String title)
       {
           mFragmentList.add(fragment);
           mFragmentTitleList.add(title);
       }

        public ViewPagerAdapter(FragmentManager manager) {
            super(manager);
        }

        @Override        public Fragment getItem(int position) {
            return mFragmentList.get(position);
        }


        @Override        public int getCount() {
            return mFragmentList.size();
        }

        @Nullable        @Override        public CharSequence getPageTitle(int position) {
            return mFragmentTitleList.get(position);
        }
    }
}

 To know more Please watch our tablayout tutorial video from below link-


Tabs with Icon & Text

Sometimes you might wanted to add an icon to Tab. Earlier adding an icon to tab is tedious process. But with the design support library it is very easy. All you have to do is call setIcons() method by passing appropriate icon. The icon will be placed in front of tab label.
Use the below code to add or set icons in your tablayout.

private void setupIcons(){
    tabLayout.getTabAt(0).setIcon(tabIcons[0]);
    tabLayout.getTabAt(1).setIcon(tabIcons[1]);
    tabLayout.getTabAt(2).setIcon(tabIcons[2]);

}


React Native Introduction

React Native         


What is ReactNative?

         React native is a javascript framework for writing real,natively  create mobile application for  android and ios .It use react framework and offer large amount of inbuild component and APIs.
React native helps you to create real and exciting mobile app with the help of java script only.Which is suppor bot plateform Android and IOS.
With use of ReactNative Development time save.
React native is released by Facebook.React Native is supported by huge community today.
ReactNative is set of component for both ios and android to build a mobile application.
For creating Reactnative mobile application you just need to know about,HTML,CSS and JAVASCRIPT.
React Native is very fast in performance.reduse development time ,
also save run time ,and build a excelent UI. 

Why is the REACT Native Framework Used?

  With use of react native framework you can create both         UI Android and IOS plateform.
React native reduse develpoment time.
The first reason to use reactnative  framework is that the developer write one set of code  (Java Script code ) for enjoy the performance of react native application.
ReactNative application is a cross pralteform .

 Cross-Platform Usage: 

  Resct native initially invented for ios development  and huge success of react natiove for ios facebook provide support of android platform also.
In future Reactnative provide support for window and TvIos also.


Application Flow Chart

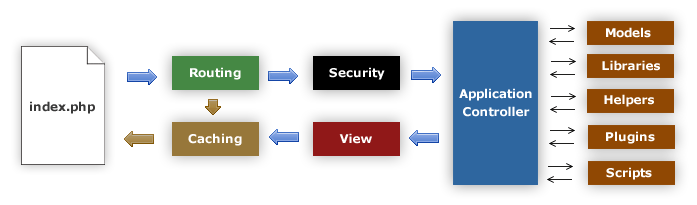
The following graphic illustrates how data flows throughout the system:
CodeIgniter application flow

  1. The index.php serves as the front controller, initializing the base resources needed to run CodeIgniter.
  2. The Router examines the HTTP request to determine what should be done with it.
  3. If a cache file exists, it is sent directly to the browser, bypassing the normal system execution.
  4. Security. Before the application controller is loaded, the HTTP request and any user submitted data is filtered for security.
  5. The Controller loads the model, core libraries, helpers, and any other resources needed to process the specific request.
  6. The finalized View is rendered then sent to the web browser to be seen. If caching is enabled, the view is cached first so that on subsequent requests it can be served.

Monday, December 3, 2018

Android ImageSlider Or ViewPager Tutorial

Android ViewPager Or ImageSlider Tutorial

ImageSlider slides one screen to another with on slide. To implements ImageSlider we use ViewPager ,you need to inherit view pager class with PagerAdapter.

First you define the viewpager in xml file give it an id.

Then In Adapter class we need to override following methods of PagerAdapter class.
  1. isViewFromObject(View, Object): This method checks the view whether it is associated with key and returned by instantiateItem().
  2. instantiateItem(ViewGroup, int): This method creates the page position passed as an argument.
  3. destroyItem(ViewGroup, int, Object): It removes the page from its current position from container. In this example we simply removed object using removeView().
  4. getCount(): It returns the number of available views in ViewPage
Now, After this find the viewpager in main activity and set the Adapter hit the run button.

To watch our tutorial video please click on below video link-


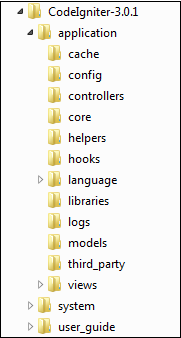
  •  Codeigniter Directory Structure:


  • As shown in the figure, whenever a request comes to CodeIgniter, it will first go to index.php page.
  • In the second step, Routing will decide whether to pass this request to step-3 for caching or to pass this request to step-4 for security check.
  • If the requested page is already in Caching, then Routing will pass the request to step-3 and the response will go back to the user.
  • If the requested page does not exist in Caching, then Routing will pass the requested page to step-4 for Security checks.
  • Before passing the request to Application Controller, the Securityof the submitted data is checked. After the Security check, the Application Controller loads necessary Models, Libraries, Helpers, Plugins and Scripts and pass it on to View.
  • The View will render the page with available data and pass it on for Caching. As the requested page was not cached before so this time it will be cached in Caching, to process this page quickly for future requests.

Directory Structure

The image given below shows the directory structure of the CodeIgniter.
Directory Structure
CodeIgniter directory structure is divided into 3 folders −
  • Application
  • System
  • User_guide

Application

As the name indicates the Application folder contains all the code of your application that you are building. This is the folder where you will develop your project. The Application folder contains several other folders, which are explained below −
  • Cache − This folder contains all the cached pages of your application. These cached pages will increase the overall speed of accessing the pages.
  • Config − This folder contains various files to configure the application. With the help of config.php file, user can configure the application. Using database.php file, user can configure the database of the application.
  • Controllers − This folder holds the controllers of your application. It is the basic part of your application.
  • Core − This folder will contain base class of your application.
  • Helpers − In this folder, you can put helper class of your application.
  • Hooks − The files in this folder provide a means to tap into and modify the inner workings of the framework without hacking the core files.
  • Language − This folder contains language related files.
  • Libraries − This folder contains files of the libraries developed for your application.
  • Logs − This folder contains files related to the log of the system.
  • Models − The database login will be placed in this folder.
  • Third_party − In this folder, you can place any plugins, which will be used for your application.
  • Views − Application’s HTML files will be placed in this folder.

System

This folder contains CodeIgniter core codes, libraries, helpers and other files, which help make the coding easy. These libraries and helpers are loaded and used in web app development.
This folder contains all the CodeIgniter code of consequence, organized into various folders −
  • Core − This folder contains CodeIgniter’s core class. Do not modify anything here. All of your work will take place in the application folder. Even if your intent is to extend the CodeIgniter core, you have to do it with hooks, and hooks live in the application folder.
  • Database − The database folder contains core database drivers and other database utilities.
  • Fonts − The fonts folder contains font related information and utilities.
  • Helpers − The helpers folder contains standard CodeIgniter helpers (such as date, cookie, and URL helpers).
  • Language − The language folder contains language files. You can ignore it for now.
  • Libraries − The libraries folder contains standard CodeIgniter libraries (to help you with e-mail, calendars, file uploads, and more). You can create your own libraries or extend (and even replace) standard ones, but those will be saved in the application/libraries directory to keep them separate from the standard CodeIgniter libraries saved in this particular folder.

User_guide

This is your user guide to CodeIgniter. It is basically, the offline version of user guide on CodeIgniter website. Using this, one can learn the functions of various libraries, helpers and classes. It is recommended to go through this user guide before building your first web app in CodeIgniter.
Beside these three folders, there is one more important file named “index.php”. In this file, we can set the application environment and error level and we can define system and application folder name. It is recommended, not to edit these settings if you do not have enough knowledge about what you are going to do.