Monday, December 10, 2018

Digital Marketing

Digital Marketing

Digital marketing is the marketing of products or services using digital technologies, mainly on the Internet, but also including mobile phones, display advertising, and any other digital medium.


Digital Marketing Methods 

Search engine optimization (SEO)
Search engine marketing (SEM)
Content marketing 
Influencer marketing 
Content automation
Campaign marketing 
Data-driven marketing
E-commerce marketing
Social media marketing 
Social media optimization
E-mail direct marketing
Display advertising
E–books 
Optical disks 
Games are becoming more common in our advancing technology.


Use in the digital era


There are a number of ways brands can use digital marketing to benefit their marketing efforts.


Word of mouth communications and peer-to-peer dialogue often have a greater effect on customers, since they are not sent directly from the company and are therefore not planned. 


Ease of access


A key objective is engaging digital marketing customers and allowing them to interact with the brand through servicing and delivery of digital media. 


Effectiveness
Brand awareness has been proven to work with more effectiveness in countries that are high in uncertainty avoidance, also these countries that have uncertainty avoidance; social media marketing works effectively.


To know more watch our video on digital marketing-


source-wikipedia,internet,google.

How to create React Native Application -

React Native Application

 In this blog am introduce some command for creating react native application.
1. How to create first project-command 
          react-native init ProjectName

2.Start npm-command
           npm start

3.Run Application
           react-native run-android

If you face error Gradle build faild -run command inside Project folder-android folder
          gradlew clean


Friday, December 7, 2018

Android Check-Box Tutorial

Android Check-Box Tutorial


CheckBox is used to implement multiple choices. There can be a lot of usage of checkboxes. For example, it can be used to know the hobby of the user, activate/deactivate the specific action etc..

Mainly for checkbox there are two methods

1. isChecked() - Returns true if it checked otherwise false.
2. setChecked(boolean status) - change the status of checkbox.

see the below piece of code:


if(pizza.isChecked()){
    result.append("\nPizza 100Rs");
    totalamount+=100;
}
if(coffe.isChecked()){
    result.append("\nCoffee 50Rs");
    totalamount+=50;
}
if(tea.isChecked()){
    result.append("\nTea 10Rs");
    totalamount+=10;
}

To watch tutorial video please click on below video link-


How to work with controllers in CodeIgniter


Controllers are the ones that receive the HTTP requests, communicate with models to get the data, send it to views to generate the HTML code and return the results to the web browser. In this tutorial, we will look at how we can use Controllers in CodeIgniter and create our own controller(s) that will extend the CodeIgniter core Controller class. This tutorial assumes you read the article on how to install and configure a CodeIgniter project. We assume you have removed the index
HERE,
  • “$route['default_controller'] = 'welcome';” defines welcome as the default controller.
  • ['custom_controller'] = 'welcome';” defines welcome as the default controller.
  • When you browse the URL localhost/Test_CI/, CodeIgniter will look for a controller named Test and by default will call the testindex method.
      <?php
      defined('BASEPATH') OR exit('No direct script access allowed');

      class Test extends CI_Controller {

      public function testindex()
      {
      echo "hello ";
      echo "welcome ";
      }
      public function user(){
      echo "hello ixora";
      }
      }
          HERE,
        • “class Test extends CI_Controller” defines the class Test and extends the codeigniter core controller.
        • “public function testindex()” is the function and here methode name is testindex

Thursday, December 6, 2018

How to install react Native

React Native Installation 
How to install reactnative-

Need Node.react native command line interface,python,Android Studio,JDk,Visual Studio.

Follow these instruction if you want to install react native
1-Node,paython,JDk
Install Node.paython2 by a Chocolatey ,this is popular package manager.
React Native require a recent version of JDK.and Paython,Both can be install by CHOCOLATEY.

Download Chocolety From This Link - https://chocolatey.org/

After download and install chocolatey run these command in command prompt-

Open an Administrator Command Prompt (right click Command Prompt and select "Run as Administrator"), then run the following command:

Command -  choco install -y nodejs.install python2 jdk8

if you have already install make sure that is current version.

Install Node from here = https://nodejs.org/en/download/
After that Node come with npm
 -install npm
Run Command in command prompt

command= npm install -g react-native-cli
After this -install Android Studio,Visual Studio latest version.
Complete installation.
You Can Watch Video here-

Tuesday, December 4, 2018

Android Tab Layout

Android Tab-Layout Tutorial

TabLayout is used to implement horizontal tabs. As you see tabs in most of the app like contacts, whatsapp etc.In this blog we learn to define tabs with fragment.

To implement in your project firstly you have to add a support library in gradle file with latest version. com.android.support:design:27.1.1

Then you have to define xml file in which yo have implements the app bar widget with tool bar and a tablayout in it. And a View Pager to scroll or slides the screen.

Now add the fragment by right click on the java folder and take blank fragments with a single text or put the code in it.

Now in MainActivity.java you have to define ViewPager Adapter class and add the following methods.

public class MainActivity extends AppCompatActivity {
    Toolbar tb;
    TabLayout tabLayout;
    ViewPager viewPager;
    ViewPagerAdapter viewPagerAdapter;

    @Override    protected void onCreate(Bundle savedInstanceState) {
        super.onCreate(savedInstanceState);
        setContentView(R.layout.activity_main);

        tb = (Toolbar) findViewById(R.id.toolbar);
        setSupportActionBar(tb);
        getSupportActionBar().setDisplayHomeAsUpEnabled(true);

        viewPager = (ViewPager) findViewById(R.id.viewpager);
        setupViewPager(viewPager);

        tabLayout = (TabLayout) findViewById(R.id.tabs);
        tabLayout.setupWithViewPager(viewPager);


    }

    private void setupViewPager(ViewPager viewPager) {
        ViewPagerAdapter adapter = new ViewPagerAdapter(getSupportFragmentManager());
        adapter.addFragment(new FirstFragment(), "First");
        adapter.addFragment(new SecondFragments(), "Second");
        adapter.addFragment(new thirdFragments(), "Third");


        viewPager.setAdapter(adapter);
    }


    class ViewPagerAdapter extends FragmentPagerAdapter {
        private final List<Fragment> mFragmentList = new ArrayList<>();
        private final List<String> mFragmentTitleList = new ArrayList<>();

       public void addFragment(Fragment fragment,String title)
       {
           mFragmentList.add(fragment);
           mFragmentTitleList.add(title);
       }

        public ViewPagerAdapter(FragmentManager manager) {
            super(manager);
        }

        @Override        public Fragment getItem(int position) {
            return mFragmentList.get(position);
        }


        @Override        public int getCount() {
            return mFragmentList.size();
        }

        @Nullable        @Override        public CharSequence getPageTitle(int position) {
            return mFragmentTitleList.get(position);
        }
    }
}

 To know more Please watch our tablayout tutorial video from below link-


Tabs with Icon & Text

Sometimes you might wanted to add an icon to Tab. Earlier adding an icon to tab is tedious process. But with the design support library it is very easy. All you have to do is call setIcons() method by passing appropriate icon. The icon will be placed in front of tab label.
Use the below code to add or set icons in your tablayout.

private void setupIcons(){
    tabLayout.getTabAt(0).setIcon(tabIcons[0]);
    tabLayout.getTabAt(1).setIcon(tabIcons[1]);
    tabLayout.getTabAt(2).setIcon(tabIcons[2]);

}


React Native Introduction

React Native         


What is ReactNative?

         React native is a javascript framework for writing real,natively  create mobile application for  android and ios .It use react framework and offer large amount of inbuild component and APIs.
React native helps you to create real and exciting mobile app with the help of java script only.Which is suppor bot plateform Android and IOS.
With use of ReactNative Development time save.
React native is released by Facebook.React Native is supported by huge community today.
ReactNative is set of component for both ios and android to build a mobile application.
For creating Reactnative mobile application you just need to know about,HTML,CSS and JAVASCRIPT.
React Native is very fast in performance.reduse development time ,
also save run time ,and build a excelent UI. 

Why is the REACT Native Framework Used?

  With use of react native framework you can create both         UI Android and IOS plateform.
React native reduse develpoment time.
The first reason to use reactnative  framework is that the developer write one set of code  (Java Script code ) for enjoy the performance of react native application.
ReactNative application is a cross pralteform .

 Cross-Platform Usage: 

  Resct native initially invented for ios development  and huge success of react natiove for ios facebook provide support of android platform also.
In future Reactnative provide support for window and TvIos also.


Application Flow Chart

The following graphic illustrates how data flows throughout the system:
CodeIgniter application flow

  1. The index.php serves as the front controller, initializing the base resources needed to run CodeIgniter.
  2. The Router examines the HTTP request to determine what should be done with it.
  3. If a cache file exists, it is sent directly to the browser, bypassing the normal system execution.
  4. Security. Before the application controller is loaded, the HTTP request and any user submitted data is filtered for security.
  5. The Controller loads the model, core libraries, helpers, and any other resources needed to process the specific request.
  6. The finalized View is rendered then sent to the web browser to be seen. If caching is enabled, the view is cached first so that on subsequent requests it can be served.

Monday, December 3, 2018

Android ImageSlider Or ViewPager Tutorial

Android ViewPager Or ImageSlider Tutorial

ImageSlider slides one screen to another with on slide. To implements ImageSlider we use ViewPager ,you need to inherit view pager class with PagerAdapter.

First you define the viewpager in xml file give it an id.

Then In Adapter class we need to override following methods of PagerAdapter class.
  1. isViewFromObject(View, Object): This method checks the view whether it is associated with key and returned by instantiateItem().
  2. instantiateItem(ViewGroup, int): This method creates the page position passed as an argument.
  3. destroyItem(ViewGroup, int, Object): It removes the page from its current position from container. In this example we simply removed object using removeView().
  4. getCount(): It returns the number of available views in ViewPage
Now, After this find the viewpager in main activity and set the Adapter hit the run button.

To watch our tutorial video please click on below video link-


  •  Codeigniter Directory Structure:


  • As shown in the figure, whenever a request comes to CodeIgniter, it will first go to index.php page.
  • In the second step, Routing will decide whether to pass this request to step-3 for caching or to pass this request to step-4 for security check.
  • If the requested page is already in Caching, then Routing will pass the request to step-3 and the response will go back to the user.
  • If the requested page does not exist in Caching, then Routing will pass the requested page to step-4 for Security checks.
  • Before passing the request to Application Controller, the Securityof the submitted data is checked. After the Security check, the Application Controller loads necessary Models, Libraries, Helpers, Plugins and Scripts and pass it on to View.
  • The View will render the page with available data and pass it on for Caching. As the requested page was not cached before so this time it will be cached in Caching, to process this page quickly for future requests.

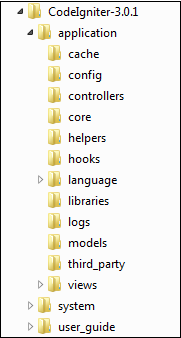
Directory Structure

The image given below shows the directory structure of the CodeIgniter.
Directory Structure
CodeIgniter directory structure is divided into 3 folders −
  • Application
  • System
  • User_guide

Application

As the name indicates the Application folder contains all the code of your application that you are building. This is the folder where you will develop your project. The Application folder contains several other folders, which are explained below −
  • Cache − This folder contains all the cached pages of your application. These cached pages will increase the overall speed of accessing the pages.
  • Config − This folder contains various files to configure the application. With the help of config.php file, user can configure the application. Using database.php file, user can configure the database of the application.
  • Controllers − This folder holds the controllers of your application. It is the basic part of your application.
  • Core − This folder will contain base class of your application.
  • Helpers − In this folder, you can put helper class of your application.
  • Hooks − The files in this folder provide a means to tap into and modify the inner workings of the framework without hacking the core files.
  • Language − This folder contains language related files.
  • Libraries − This folder contains files of the libraries developed for your application.
  • Logs − This folder contains files related to the log of the system.
  • Models − The database login will be placed in this folder.
  • Third_party − In this folder, you can place any plugins, which will be used for your application.
  • Views − Application’s HTML files will be placed in this folder.

System

This folder contains CodeIgniter core codes, libraries, helpers and other files, which help make the coding easy. These libraries and helpers are loaded and used in web app development.
This folder contains all the CodeIgniter code of consequence, organized into various folders −
  • Core − This folder contains CodeIgniter’s core class. Do not modify anything here. All of your work will take place in the application folder. Even if your intent is to extend the CodeIgniter core, you have to do it with hooks, and hooks live in the application folder.
  • Database − The database folder contains core database drivers and other database utilities.
  • Fonts − The fonts folder contains font related information and utilities.
  • Helpers − The helpers folder contains standard CodeIgniter helpers (such as date, cookie, and URL helpers).
  • Language − The language folder contains language files. You can ignore it for now.
  • Libraries − The libraries folder contains standard CodeIgniter libraries (to help you with e-mail, calendars, file uploads, and more). You can create your own libraries or extend (and even replace) standard ones, but those will be saved in the application/libraries directory to keep them separate from the standard CodeIgniter libraries saved in this particular folder.

User_guide

This is your user guide to CodeIgniter. It is basically, the offline version of user guide on CodeIgniter website. Using this, one can learn the functions of various libraries, helpers and classes. It is recommended to go through this user guide before building your first web app in CodeIgniter.
Beside these three folders, there is one more important file named “index.php”. In this file, we can set the application environment and error level and we can define system and application folder name. It is recommended, not to edit these settings if you do not have enough knowledge about what you are going to do.

Google Play Policy part-2

Google Play -Developer Policy Center


4.Privacy, Security, and Deception
   a.User Data
          Developer  must be transparent in how you handle user data.for example -information collected from user including device information developer need to secure all the information .if disclose information and missuse then app will be remove from google play store.
Personal and sensitive user data collection purposes directly related to providing and improving the features of the apps with user permission.
app must be disclose inside app and google play also how use to use user data.
in app must include a request for user data content.

  b. Device and Network Abuse

          Google play didnot allow that interface  with disturb ,damage or access in unauthorise manner the user's device.other device or computer,server or network.
c.Malicious Behavior
       Google play not allow apps that steal data ,secretly monitor or harm users,or otherwise malicious.
that are also not allow- Viruses, trojan horses, malware, spyware or any other malicious software.

5.Monetization and Ads

  a.Payments 

      Here are some examples of products supported by Google Play In-app Billing:
       *Virtual game products, including coins, gems, extra lives or turns, special items or equipment, characters or avatars, additional levels or playtime.
       *Some of the app functionality or content  that will be not available in free version .
      *Subscription services, such as streaming music, video, book, or other media services.
*Cloud software products, including data storage services.

b.Subscriptions and Cancellations 
If a user cancels a subscription purchased from an app on Google Play, google policy that the user will not receive a refund for the current billing period, but will continue to receive their subscription content for the remainder of the current billing period, 

c.Ads -
 Goolge play  allow ads only be displayed within the app  serving.goolge play consider ads served in your app as part of your app.


Note:- For read all the policy of google play please click blow link https://ixorainfotech.blogspot.com/2018/11/google-play-store-privacy-policy-to.html


Thankyou.

Sunday, December 2, 2018

Codeigniter tutorials for beginners

what is codeigniter framework

CodeIgniter is based on the Model-View-Controller (MVC) development pattern. MVC is a software approach that separates application logic from presentation. ... A View will normally be a web page, but in CodeIgniter, a view can also be a page fragment like a header or footer.

Codigniter features

  • Model-View-Controller Based System
  • Extremely Light Weight
  • Full Featured database classes with support for several platforms.
  • Query Builder Database Support
  • Form and Data Validation
  • Security and XSS Filtering
  • Session Management
  • Email Sending Class. Supports Attachments, HTML/Text email, multiple protocols (sendmail, SMTP, and Mail) and more.
  • Image Manipulation Library (cropping, resizing, rotating, etc.). Supports GD, ImageMagick, and NetPBM
  • File Uploading Class
  • FTP Class
  • Localization
  • Pagination
  • Data Encryption
  • Benchmarking
  • Full Page Caching
  • Error Logging
  • Application Profiling
  • Calendaring Class
  • User Agent Class
  • Zip Encoding Class
  • Template Engine Class
  • Trackback Class
  • XML-RPC Library
  • Unit Testing Class
  • Search-engine Friendly URLs
  • Flexible URI Routing
  • Support for Hooks and Class Extensions
  • Large library of “helper” functions

model-view-controllers

CodeIgniter is based on the Model-View-Controller development pattern. MVC is a software approach that separates application logic from presentation. In practice, it permits your web pages to contain minimal scripting since the presentation is separate from the PHP scripting.
  • The Model represents your data structures. Typically your model classes will contain functions that help you retrieve, insert, and update information in your database.
  • The View is the information that is being presented to a user. A View will normally be a web page, but in CodeIgniter, a view can also be a page fragment like a header or footer. It can also be an RSS page, or any other type of “page”.
  • The Controller serves as an intermediary between the Model, the View, and any other resources needed to process the HTTP request and generate a web page.

Saturday, December 1, 2018

How to Upload Image and File in Codeigniter 

File uploads are an essential process in many web apps. Besides having Best PHP Hosting, almost every website and web app requires an integrated file upload component. File and image upload in CodeIgniter powered app is a simple component that takes care of the upload process with little issues.
This tutorial discusses the process of creating a CodeIgniter based file upload component that could be easily used t upload images and other files with ease. You could validate and even restrict file size and type during the upload process.


Folder Creation:

The first step is the creation of two folders that form the basis of the upload process. The first folder is the destination folder that would receive the uploaded files.Next, go to the root of the CI installation and create a folder named “upload”.

Create the Controller:

The next step is the creation of a file in the controller folder.  Name the file service.php. In this file, I will load a library for initializing the Upload class through the following code.

Create the Model:

The next step is the creation of a file in the models folder.  Name the file Smodel.php